Recipes and Tips for Healthier Living and Smarter Budgeting
Showing posts with label no meat dishes. Show all posts

Friday, February 14, 2014

Homemade Stovetop Mac & Cheese

One of my daughters recently requested macaroni and cheese for her birthday dinner (can you tell she just turned six?), which gave me the opportunity to make this again and take an updated picture to re-post this yummy recipe.

Original post March 2013:
So far, any homemade macaroni and cheese I've made for my kids they haven't been too fond of, so Annie's Mac & Cheese always wins the rating. But I am hopeful that someday they will recognize how much better the homemade version is.

So I went looking--again--for a homemade recipe and I found one on thekitchn that is the closest I ever come to recreating boxed macaroni (although, I think it tastes better). I will definitely be making it again! It didn't turn out nearly as pretty as the pics on the original website (probably mostly because I used whole wheat pasta) but it tasted great! And it's actually simpler than other recipes I've tried. Please check out the above link and get inspired.


Homemade Stovetop Mac & Cheese

1 pound pasta, any shape (I used whole wheat pasta)
1 1/2 c. whole or 2% milk
2 Tb. flour (I used whole wheat flour)
2-3 c. shredded cheese--like cheddar, monterey jack, or colby
1/2 tsp. salt (or more, to taste)
1/4 tsp. powdered mustard
Optional extras (cook before adding): Ham, bacon, onions, peas, mushrooms, peppers, broccoli, cauliflower
Boil pasta until cooked. Drain and set aside.

Begin warming 1 c. of the milk in saucepan over medium heat. Whisk together remaining 1/2 c. of milk and flour until there are no lumps. When you just start to see tendrils of steam rising from the warming milk, whisk in the milk-and-flour mixture. Continue whisking gently until milk thickens slightly to the consistency of heavy cream, 3-4 minutes.

Turn heat to low and begin mixing handfuls of cheese into milk. Stir in salt and mustard. Stir until all cheese has melted and sauce is creamy. Taste and adjust seasonings as desired. Remove sauce from heat.

In a large serving bowl, combine pasta and half of cheese sauce. Stir to coat pasta evenly. Add second half of sauce and any extra add-ins.

Serving and Storing Leftovers: Serve the mac and cheese immediately while still warm. Leftovers will keep for up to a week and can be reheated in the microwave. If the sauce is a little dry after re-heating, mix in a splash of milk to make it creamy again.

Thursday, January 23, 2014

Minestrone Soup

Here is a hearty soup perfect for cold winter evenings. 

Original post March 2010:
This is one of those tasty, wholesome soups that is a meal in itself. (Most of the time I omit the meat and it's still delicious.) This recipe also works in the crockpot as long as ingredients are added in stages: beans first for a couple hours, then vegetables, then pasta last (or added at end, fully cooked).

Minestrone Soup

1.5 lbs (or less) cooked beef stew meat, lean, chopped - optional
Heaping 1/2 c. dry white beans
Heaping 1/2 c. dry great northern beans (or navy)

Cook above ingredients (following bean cooking instructions-under #3), then add the following ingredients:

3 cans beef or chicken or vegetable broth (or homemade bone broth)
2 1/2 c. water
2 medium sweet or regular onions, chopped
2 ribs celery, chopped
3-4 cloves garlic, minced
1 1/2 c. carrots
2 c. small zucchini
Salt and pepper to taste
1 1/2 tsp. Italian seasoning
1 can Italian style tomatoes (cut with juice)
1 c. dry seashell (or other) pasta

Toppings (not shown in picture):
fresh Parmesan cheese
16 oz. can olives

Monday, January 6, 2014

Black Bean Soup

This is a newer Family Favorite that I'm re-posting from 2012. During the winter, especially, a warm, hearty soup really hits the spot on a cold evening. And I love how this one can be catered to each person, depending on which toppings he or she likes.

Original post:
The other night I made this black bean soup recipe posted on Word of Wisdom Living a little while ago. It's Skip's own recipe and I didn't modify it at all (except to omit the jalapenos and celery). You really should check out the original, with beautiful picture included. I don't remember ever having a black bean soup more delicious than this one! The spices are perfect (and I was so glad for the guidance in that area because often I am at a loss as to what other spices a recipe needs), and the result is a savory and satisfying soup that is hard to stop eating, it's so good. Plus, it's so healthful, what's not to love?!

Skip's Black Bean Soup
Yields 6 servings

1 lb. dried black beans, rinsed and drained
1 qt. homemade chicken stock
2 c. water (if beans aren’t soaked overnight)
1 bay leaf
1 carrot, finely sliced
2 Tb. olive oil
1 Jalapeno pepper, seeds removed and diced
4 cloves garlic, minced
½ bell pepper
½ onion, chopped
2 ribs celery, chopped
½ tsp. cumin
½ tsp. ground oregano
½ tsp. chili powder
½ tsp. black pepper
1 tsp. salt (or to taste, depending on salt in stock)
1 Tb. vinegar (optional)
1 lime (optional)

1. Black beans may be soaked overnight in 6 cups water and then drained, or alternately, begin with dry beans.   (See my bean cooking tip #3.) If beans weren’t soaked overnight, combine chicken stock, water, black beans, and bay leaf in a saucepan, bring to a boil, then simmer ½ hour.

2. While beans are simmering, wash and prepare vegetables. Saute jalapeno pepper in olive oil several minutes; add garlic and cook one minute more.

3. When step #1 is done, add carrots to simmering pot. After 30 minutes add sautéed jalapeno pepper and garlic, bell pepper, onion, and celery to pot. Add seasonings and stir well.

4. Simmer 1 to 1½ hours more until beans are tender but not mushy. Stir several times each hour. (If you want natural rice with the soup, this is a good time to cook the rice.)

5. Remove about half of soup from pot and puree with a blender, and then return to pot.

Adjust seasoning as needed. Add water if needed for desired consistency. 

Black bean soup may be served over rice and garnished with your choice of lime juice, sour cream, avocado, tortilla chips, chopped onions, grated cheese, parsley or cilantro. Black bean soup is pretty basic; the garnishments make it interesting. 

This recipe can be adapted to a slow cooker, or simplified by using canned black beans, canned chilies, and store-bought chicken broth if you’re running short on time.

Tuesday, September 24, 2013

Squash and Potato Gratin

As the garden season begins to wind down in most areas of the country, some of us are still looking for new squash recipes. I love squash of all types, but I have to have variety! And I understand that not everyone likes squash. Two of my kids don't, so I'm always looking for new ways of serving it. (I have this mommy quest of converting them eventually...) So when I came across this recipe on the Bountiful Baskets blog, I knew I had to give it a try. Verdict? Well, not everyone loved it, but everyone tried it, and it's definitely one I'll be making again. It's so full of flavor! With the basil, olive oil, and Parmesan cheese, it just shouts Italian.

Squash and Potato Gratin

2 medium yellow summer squash
1 pound red or russet potatoes
3 Tb. olive oil
8 oz. Monterrey Jack cheese (I used less by just sprinkling it over each layer until it seemed enough)
Salt and freshly ground black pepper
1/4 c. milk
1/3 c. freshly grated Parmesan cheese
1 tsp. dried basil

Preheat oven to 400°F. Grease a 1 1/2 to 2-quart casserole dish.

Slice squash and potatoes very, very thin. Place in bowl; toss with olive oil.

Place 1/3 of squash and potato slices into bottom of pan. Spread evenly.

Season with salt and pepper and half of cheese.
Repeat layering with 1/3 of veggies, seasoning with S&P, and sprinkling with cheese.

Finish gratin by layering final veggies on top and seasoning with S&P.

Pour milk over casserole, then top with Parmesan cheese.

Bake for 30 minutes covered, then uncover and finish baking for 15 minutes (or more, until veggies are tender and cheese is golden brown).

Posted by Picasa

Monday, September 9, 2013

Fancy Fan Potatoes

This old family recipe is a classic on my mother's side of the family. It's very easy to make and so delicious that even my potato-shy 5-year-old has been known to eat it without complaining. It looks fancy enough to be served to dinner guests, but easy enough to make for a regular family dinner (as the main coarse). Surprisingly, it is even good as leftovers!

Note: This recipe is vegetarian-friendly!

Originally posted here in March 2012.

FANCY FAN POTATOES

4 medium-sized potatoes
1/4 c. soft butter
1 Tb. dried parsley
1/2 tsp. salt
1/4 tsp. paprika
1/4 tsp. dried dill seed or weed (I prefer the latter)
1/8 tsp. black pepper

Grease baking dish and wash potatoes.

Cut potatoes in 1/4" wide slices to within an inch from bottom. Place in greased dish.

Melt butter in small bowl, add spices; mix. Drizzle butter mixture over potatoes, making sure slices are slightly separated so mixture gets down inside.

Cover dish with foil and bake at 425 for about 45 minutes.

If you want potatoes a little extra crispy, remove foil and allow to bake for 10-15 minutes more.

Wednesday, August 28, 2013

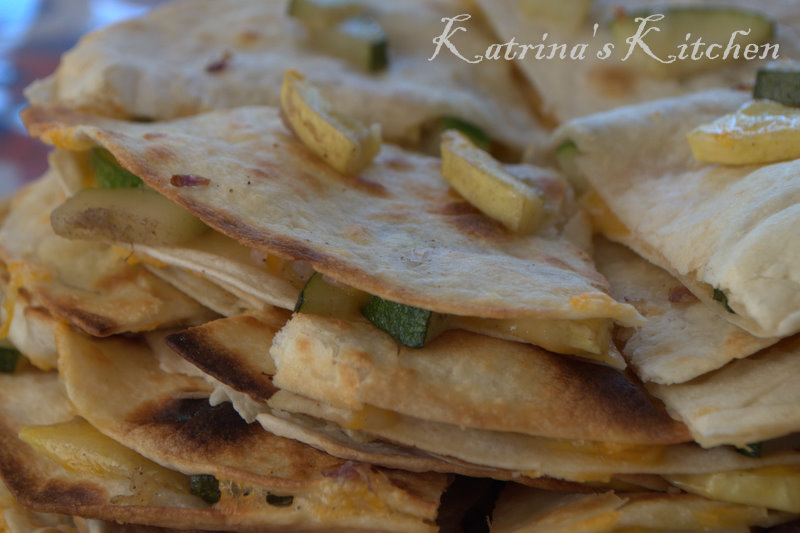
Fiesta Veggie Quesadillas


I recently made these after quite a long while of forgetting about the recipe. I don't know how I forgot because these quesadillas are so delicious! And they are such a good way to use up extra garden squash. So I thought I would re-post this recipe with an update and pictures.

Written in December, 2010:

Last night I had some big, beautiful summer squashes I needed to use (thanks to my last Bountiful Basket), but wanted a new recipe. So I did a search online and ended up combining two recipes from allrecipes.com. The result was so delicious! And the color combination was beautiful, with all that yellow, red, and green. The different flavors complement each other very well, yet the recipe is versatile so you can make it how you like it and mix and match different vegetables. What a wonderful way to get your veggies!

Fiesta Veggie Quesadillas

1/2 c. chopped red bell pepper
1/2 c. chopped zucchini (I used extra summer squash, since I didn't have zucchini)
1/2 c. chopped yellow (summer) squash
1/2 c. chopped red onion (I used green onions instead)
1/2 c. chopped mushrooms (I didn't have these, though I wished I did)
1 Tb. olive oil
6 9-inch whole wheat tortillas
1 1/4 c. shredded cheese of choice
1/2 c. salsa
1 tsp. ground cumin
1/2 tsp. salt
1/4 c. chopped fresh cilantro

In a large nonstick pan, cook vegetables in olive oil until just tender.

Add cumin and salt; mix well.

Meanwhile, lightly grease cookie sheet.

When vegetables are tender and tortillas warm, make quesadillas as follows:

Sprinkle 1/4 c. of cheese evenly over a tortilla, and layer 3/4 c. of vegetable mixture over cheese. Sprinkle another 1/8 c. of cheese over vegetables. Top with a second tortilla. Fill cookie sheet with quesadillas and place in 350 degree oven until cheese is melted and tortillas are slightly browned. Note: A faster option is setting the oven on broil. But only do this if you can closely monitor them, as they brown in only a minute or two. Then flip them over so the other sides can brown.

Cut each quesadilla into triangles with a pizza cutter. Serve hot, with salsa, cilantro, etc, as desired.

Note: I was afraid this recipe wouldn't make enough for our family, but it was plenty, since I filled my husband's and my quesadillas quite full (but not our children's). I served the quesadillas with a green salad and a gelatin salad (made with the blackberries from our Bountiful Basket). Very satisfying!

Friday, June 14, 2013

Stuffed Green Peppers

This Family Favorite recipe was created from a combination of my mom's recipe and others that I tried and liked, changing the process so that the filling is mostly cooked on the stove top and then finished up quickly in the oven (which is easier and faster for me and is a more sure way of making sure the mixture is completely cooked). 

My oldest kids still haven't learned to like green peppers, but one of them will at least eat a little of the pepper part, and both will eat the filling, which I make extra of. Ironically, the youngest eats it all.

Note: This would be an easy recipe to turn vegetarian, if desired, by omitting the ground beef and substituting vegetables, or just using the rice mixture.

STUFFED GREEN PEPPERS

Bring 3 c. water to boil for rice. Once boiling, pour in 1 1/2 c. brown rice, replace lid lightly (allow for steam to escape). Add a bit more water, as needed, toward end of cooking.

Cook 1 lb. hamburger in skillet with 1 onion, diced.

Cut 5 green bell peppers in half and de-vein. Parboil in salted water for 5 minutes. Remove pepper halves from pot with tongs and place in 9x12" baking dish.

Preheat oven to 350 degrees.

When hamburger and rice are fully cooked, pour both into a large mixing bowl and add the following:

1 tsp. salt (or more, if needed)
pepper, to taste
1 beaten egg
1/2 c. milk

Mix with spoon until well combined.

Spoon mixture into pepper halves until very full. Pour any extra into pan in between peppers. Sprinkle grated cheddar cheese generously over all.

Place dish in oven and bake for 30+ minutes at 350 until heated through (and egg is completely cooked) and cheese is melted and slightly browned.

At any stage during baking or afterward, can also add sauce from below recipe or 1 can of tomato sauce (or ketchup, if desired--ketchup can sometimes do wonders with getting kids to eat stuff).

SAUCE (mix in small saucepan while heating gradually):

1 can tomato sauce
1 Tb. honey
dash of Tabasco sauce
1/2 Tb. Worcestershire sauce
3 Tb. flour

Stir until well mixed, then heat until bubbly and thickened (a few minutes). Spoon over peppers.

Tuesday, June 11, 2013

Creamy Butternut Squash Soup


I've been trying for a while to find a good butternut squash soup recipe that my kids would like, and I think I've finally hit upon the right one. This comes from Taste of Home and I modified very little (just used chicken broth instead of the MSG- laden chicken bullion). There's just something so warm and comforting about the nutty, buttery flavor of a bowl of this wholesome, filling soup.

Creamy Butternut Squash Soup
Yield: 2 servings--so for a family, you'll need to double or triple this recipe

1/4 c. chopped onion
1 Tb. butter
3 c. cubed peeled butternut squash
1 medium potato, peeled and cubed
1-1/2 c. water
1 can chicken broth (about 2 c.)
1/4 tsp. salt
Dash pepper
1/4 c. evaporated (or other) milk
I also added some celery and shredded zucchini, which I needed to use up and also needed to disguise so my kids would eat it. Since this soup is pureed at the end, it's a great one to throw extra veggies into for added color, flavor, and nutrition.

In a small saucepan, saute onion in butter until tender. 

Add squash and potato (and other veggies, if using); cook and stir for 2 minutes. 

Add chicken broth, salt and pepper; bring to a boil. Reduce heat; cover and simmer for 15-20 minutes or until vegetables are tender.
Cool slightly. Using an immersion blender (or regular blender), process soup until smooth. Return to pan; stir in milk and heat through.

Wednesday, May 29, 2013

Pea and Corn Salad

I first posted this three years ago and it continues to be a family favorite, liked by all of my children (which is generally a difficult accomplishment).

This is my mother's variation on a family recipe that originally called for only peas, Accent (with MSG), chicken, and Pepper Jack cheese. I avoid using MSG, prefer this recipe without the chicken, don't like Pepper Jack cheese, and love the sweetness that only raw corn has, so this is how I now make this salad (but feel free to vary it according to your own family's tastes):

PEA AND CORN SALAD

1 lb. thawed frozen peas
1 lb. thawed frozen corn
cubed cheese (I usually use mozzarella)
croutons

dressing:
2/3 c. mayonnaise
3/4 tsp. salt or seasoned salt (without MSG)
1/2 tsp. garlic powder (or 1 clove garlic)
1 tsp. (or more) minced onion

Mix all ingredients thoroughly (to taste) and add croutons at the last minute. If I know that not all the salad will be eaten in one sitting, I will add croutons to only a portion of it, since croutons get soggy quickly.

Monday, December 3, 2012

Bean Salad Wraps

Last week I got to craving this dish so bad it surprised me, but when I made it, it hit the spot like nothing had for a long time. With its few ingredients married in the perfect combination, this dish is satisfyingly delicious.

Recipe source: Better Homes & Gardens cookbook, p. 83

Bean Salad Wraps

4 8-inch whole wheat (or other variety) tortillas
1 15-ounce can black beans, rinsed and drained
1/2 c. chopped green sweet pepper
2 Tb. snipped fresh cilantro
1/3 c. mayonnaise dressing or salad dressing
1 Tb. lime juice
Leaf lettuce

In medium bowl, mash black beans slightly. Add sweet pepper and cilantro. Stir in mayo and lime juice.

To serve, spread bean mixture evenly over tortillas. Top with lettuce leaves. Roll up tortillas.

Monday, September 24, 2012

Sunshine Soup

This soup is made with yellow summer squash from our garden, and is so pretty I like to call it Sunshine Soup. It looks so cheery (hard to capture with my camera) and the taste is delectable. Plus, my girls don't even complain too much about eating it (since there really isn't anything to complain about), and it's a very simple recipe. I found it on the Taste of Home site and made very few modifications.

Sunshine Soup
Yield: 6 servings

5 small yellow summer squash, cubed
2 green onions, cut into 3-inch pieces (or half a regular onion, diced)
2 tablespoons butter
1 can (14-1/2 ounces) chicken or vegetable broth
1/2 teaspoon salt
1/8 to 1/4 teaspoon white pepper
1-1/2 cups heavy whipping cream (I just used milk)

In a large saucepan, saute squash and onions in butter until tender. 
Stir in broth, salt and pepper; bring to a boil. 
Reduce heat; cover and simmer for 20-25 minutes or until vegetables are tender.
Cool slightly. Process in batches in a blender (or use immersion blender right in pan); return all to pan. Stir in cream/milk and heat through. 

Thursday, August 16, 2012

Chicken (or Vegetable) Divan--Without Canned Soup!

I was introduced to Chicken Divan a few years ago when a friend of ours made it for us. It was so much better than the chicken, broccoli, rice casserole I'd grown up with that I couldn't believe it.

Since then, I've tried other recipes and played around with things and finally have a Chicken Divan recipe--that doesn't use canned soup--that we really like. My latest inspiration came from this blog, which includes beautiful, step-by-step instructions. Since it's summer and we constantly have lots of squash to use, I added some to this recipe and it was delicious and added substance and color. (For vegetarians, I also believe this recipe would be good as Vegetable Divan, with the elimination of the chicken.)


Chicken Divan

4 c. cooked brown rice
3 chicken breasts, cooked and chopped into bite size pieces
2 c. broccoli, cooked and diced
1-2 c. squash, diced
1 onion, diced
About 4 Tb. butter
1/3 c. whole wheat flour
2 c. milk
Salt/Pepper
1 - 2 tablespoons curry powder
1/2 c. mayo
1/2 c. or more of shredded cheddar

While rice, chicken, and broccoli cook (all in separate pans), heat up some oil (preferably extra virgin olive oil) in a large skillet and saute onions and squash until just softened. When broccoli is finished cooking, combine it with cooked onions and squash.

In medium saucepan, melt butter and when melted add flour. Continue to stir and cook flour for 5 - 10 minutes over medium or medium-low heat. When it starts to smell toasty, it's done. If it's too thick, add some of the milk to keep mixture from burning and to facilitate stirring.

Add all milk and stir until mixture starts to thicken again. Add salt/pepper. Add cooked vegetables and chicken. Stir until combined. If too thick, add more milk. Add curry. Taste and add more seasonings, as desired.

Remove from heat. Stir in mayo.

Pour into 9 x 12 square baking dish. Sprinkle cheese over top.

Bake for about 20 minutes, or until cheese is melted and has a touch of color, and the casserole is bubbling.

Serve over the warm rice.

Wednesday, July 18, 2012

Risotto Revisited


Over two years ago I posted this recipe of mine, which is a family favorite. The other day while browsing the internet for butternut squash recipe ideas, I got the idea to just cook the butternut squash, cube it, and add it to this yummy recipe. It was wonderful! Not only does the squash add that delectable butternut flavor, which complements the risotto perfectly, the addition of this veggie, makes the recipe more healthful.

Katrina's Risotto

Half butternut squash, baked and cubed
4 to 5 c. chicken broth
4 Tb. butter
1/2 medium onion (or more), diced and sauteed in the butter (or, in a pinch, use 2 Tb. minced onion--but it's not nearly as good)
1 1/2 c. brown rice

2/3 c. grated Parmesan cheese--or use Mozzarella and Parmesan

Heat broth until boiling. Add rice. Cook until tender (35-45 minutes).

When rice is ready, add sauteed onion and cubed squash.
Add cheese. Stir and serve.

Wednesday, February 8, 2012

Island Franks

The original version of this recipe, long loved by many members of my family, includes hot dogs. As those aren't the healthiest items to be eating, we have recently discovered that the recipe can be modified to include more vegetables and other types of meat--or none at all. However we've made it, as long as it includes lots of sauce, it's delicious!

Island Franks
(Topping for Rice)

1 9-oz can (1 c.) pineapple tidbits
1/2 lb. meat of choice, cooked and cut into bite-sized pieces (optional)
2 Tb. butter
1/2 c. sliced onion
1 green pepper, cut in strips
Other vegetables*, if desired

Sauce:

1 can broth (or equivalent amount of homemade bone broth)
1 Tb. cornstarch
1/2 Tb. honey
dash of salt
2 Tb. vinegar
1 Tb. soy sauce

Drain one can pineapple tidbits, reserving juice.

In skillet, melt butter. Add sliced onion and green pepper. Cover and cook over low heat 5 min.

Mix cornstarch with reserved pineapple juice until cornstarch is dissolved and not lumpy (this is easy to do as long as the juice is not yet heated).  Add honey, salt, vinegar, and soy sauce. Add can of broth. Cook and stir until mixture thickens. Add pineapple. Add meat, if desired. Heat thoroughly.

Serve over hot brown rice.

*So far we have tried chopped cabbage and broccoli--but really, whatever you have on hand that needs using--and increased the sauce amount, as needed. Yum! 


Monday, August 8, 2011

Cheesy Cauliflower Bake

Wanting to try something different with the cauliflower we received in a Bountiful Basket (I usually make it into this soup), I experimented with an idea I found online. It was so simple I figured I couldn't go wrong. My kids tried it and weren't real excited (I still have trouble getting them to eat many vegetables), but my husband and I really liked it. Maybe if I put more cheese next time, my kids will be suckered into it...

After cutting up the cauliflower into the size I wanted (small, so it would cook faster), I put it all on a cookie sheet and drizzled olive oil over the top.

Then I sprinkled a couple of my favorite spices over that (garlic salt and pepper, I think), then sprinkled shredded cheese over that.

Lastly, I cooked it in a 350 degree oven for 30+ minutes, until tender.

Now I have another cauliflower and am wondering, what are your favorite ways to eat this unique vegetable?

Posted by Picasa

Friday, April 29, 2011

Broccoli Casserole

We've been getting a lot of broccoli lately and I wanted to try something new. So I found this recipe on about.com and tried it out. We loved it!

Broccoli Casserole
Serves 6

10 to 12 ounces frozen chopped broccoli, cooked and drained (I think the fresh bunch of broccoli I used was closer to 16 ounces)
2 Tb. butter
2 Tb. finely minced onion
2 Tb. all-purpose flour
Dash pepper
1/8 tsp. nutmeg
1/2 tsp. salt
1 1/2 c. half-and-half or light cream (I didn't have either, so I used milk and it worked just fine)
1 1/2 c. shredded sharp cheddar (6 ounces) (I used a little more regular cheddar)
3 large eggs, beaten

Heat oven to 350°. Grease a 9 x 12 dish. Arrange the cooked and drained broccoli in the casserole.

Heat the butter in a large skillet; add onion and sauté for about 2 to 3 minutes, until onion is tender. Stir in flour until well blended and cook, stirring, for 1 minute. Add the pepper, nutmeg, salt, and half-and-half (or milk). Continue cooking over low heat until thickened. Stir in cheese and cook just until cheese is melted. Add beaten eggs, blend well. Pour over broccoli. Bake for 35 to 45 minutes, until a knife inserted in the center of the broccoli casserole comes out clean.

Friday, February 4, 2011

Chiles Rellenos Casserole

Another less-used produce item we received in our Bountiful Basket was long, sweet peppers (green).*  I was relieved they weren't jalapenos, since my heat tolerance is now back down to low, due to my not-often-enough contact with real Mexican food. (Sigh.) I decided I wanted to make chiles rellenos with the peppers, but not wanting to actually fry them in oil, I found a recipe on allrecipes.com (which I modified, surprise, surprise) for a casserole that looked quick and easy. While my kids weren't thrilled by it (they don't like peppers), my husband and I thought it was delicious! In fact, if we hadn't finished it already, I'd like some right now...

*I also make this with red, yellow, and orange peppers, as seen in the picture.

Chiles Rellenos Casserole

About five medium long, green chilies, cut in half with seeds and pulp removed, sliced into small pieces.
About 1 c. Monterey Jack cheese, shredded
About 1 c. Mozzarella or Cheddar cheese, shredded
3 eggs, beaten
1 (5 oz) can evaporated or regular milk
2 Tb. flour
1 (8 oz) can tomato sauce


Preheat oven to 350 degrees. Grease a 9x13-inch baking dish.
Lay half of the chilies evenly in bottom of baking dish. Sprinkle with half of the Jack and Cheddar cheeses, and cover with remaining chilies.

In a bowl, mix together the eggs, milk, and flour, and pour over the top of the chilies.

Bake for 25 minutes. Remove from oven, pour tomato sauce evenly over the top, and continue baking another 15 minutes. Sprinkle with remaining Jack and Cheddar cheeses, and serve.

Monday, January 17, 2011

Eggplant Parmigiana

A little while ago we got a good-looking eggplant in our Bountiful Basket and, while I really like Ratatouille, I wanted to find a recipe my kids might like more than they liked that one. So first I went to my Better Homes and Gardens cookbook, and there I found this recipe (p. 518), which I had never tried before. I loved it! Somehow it just really hit the spot for me. And much to my amazement, not only did my six-year-old like it (she had decided it was pasta and we didn't correct her), but most miraculous of all, my almost three-year-old couldn't get enough of it! I totally did not expect that. I don't know if that will happen again next time I make it, but I hope so.

Eggplant Parmigiana

1 small eggplant (12 ounces)
1 beaten egg
1/4 c. flour
2 Tb. oil
1/3 c. grated Parmesan cheese (we used fresh)
1 c. meatless spaghetti sauce
3/4 c. shredded mozzarella cheese (3 ounces)

Wash and peel eggplant; cut crosswise into 1/2-inch slices.

Combine egg and 1 Tb. water. Dip eggplant slices into egg mixture, then into flour, turning to coat both sides.

In a large skillet cook eggplant, half at a time, in hot oil 4 to 6 minutes or until golden, turning once. (If necessary, add additional oil.) Drain on paper towels.

Place the eggplant slices in a single layer in a 2-quart rectangular baking dish. (If necessary, cut slices to fit.) Sprinkle with Parmesan cheese. Top with spaghetti sauce and the mozzarella cheese.

Bake in 400 degree oven for 10 to 12 minutes or until heated through.

Monday, November 22, 2010

Best Thanksgiving Yams


I have made this recipe for a couple different Thanksgiving gatherings and people have enjoyed it. As you know, there are tons of yam or sweet potato recipes for Thanksgiving, but if you're looking for something a little different, try this one. It doesn't try to disguise the tasty vegetable and fruit with tons of refined sugar and marshmallows. Instead, it enhances their natural flavors in a way that somehow still reminds me of pie. With so many other sugar-filled items served at the celebration, why not make a healthy, yummy yam dish? (By the way, I got the recipe from my aunt Kristen, an excellent and creative cook.)

Followup note: I made it for Thanksgiving 2010 for a family gathering full of people who don't like yams but eat the token spoonful each Thanksgiving. None of them seemed at all excited about my offer to make a yam dish, but they let me do it--and I got tons of compliments and several even asked for the recipe! I felt like that was mission accomplished because I love helping others rediscover undervalued/unappreciated healthful foods.


Best Thanksgiving Yams

Wash, scrub about 4 large yams. Place in pot with enough water to cover and boil until cooked all the way through but not mushy (check with a fork). Drain off water, allow yams to cool. Then carefully peel (you want them to look as nice as possible when you're done).

Slice yams into a 9 x 12 casserole dish. Slices should be about 1/4"-1/2" thick.

Peel and slice 2-3 apples over top of yams and arrange neatly. (I like to use Jonathan or another variety that has some tartness to it.)

Pour thickened juice mixture over that:

Juice mixture

2 c. apple juice concentrate (Other years I have used apple raspberry juice concentrate or apple cran-raspberry, which were also superb)
4 Tb. cornstarch - mix into juice before heating, then heat to boiling and stir till thickened and clear.

Add the following to juice mixture (all these delectable spices say "holidays" to me!):
1 tsp. cinnamon
1 tsp. nutmeg
1 tsp. cloves
1/2 tsp. allspice
1/4 tsp. ginger

Serve dish warm (so you may need to keep in a warm oven until time to serve).

Just before serving, sprinkle cashews over top.

Monday, November 15, 2010

Curry Vegetables (Crock Pot Recipe!)


Thanks to my friend, Carolyn, for this delicious recipe! I heard she was making it the other day and it sounded so good I asked her for the recipe. The picture didn't turn out very well, but I love all the cheery colors of this combination, in addition to its great taste and nutrition--and that it's a crock pot recipe is a bonus. (Note: it's not spicy if you follow the directions as written, just flavorful.)

Curry Vegetables

2 cans drained and rinsed garbanzo beans
1 diced red pepper
4 tiny potatoes or 1 large sized potato (I used 3 medium potatoes)
1/2 c. diced carrots
1/2 c. diced celery
3 cloves, crushed
2 Tb. curry
1/2 tsp. ground coriander
1/4 tsp. red (cayenne) pepper
1 tsp. salt
1 can tomatoes and juice
2 c. vegetable (or chicken) broth
3/4 c. plain yogurt (or sour cream)
1 c. frozen peas (added later)

Directions:

Pour drained and rinsed garbanzo beans in to crockpot.
Cover with diced vegetables (if you have other veggies you want to use besides those listed, change things up).
Add spices.
Add tomatoes, yogurt, and broth.
Stir to mix flavors.

Cook on low for 8-10 hours. (I started it on high for an hour or so, then turned it down to low and cooked it for a total of about 4 hours, and it turned out great.)

20 minutes before serving, stir in frozen peas and turn to high heat.

Serve over hot (brown) rice.

LinkWithin

Related Posts Plugin for WordPress, Blogger...